

Solving Common Problems & Good Work Practices
Learn a few tips on preparation and painting techniques for your next painting project.This is a follow up article from my last one back in May. It was a busy season!
Here I’d like give some readers advice on their next painting project, specifically what’s involved in the most typical cases of interior and exterior painting projects that we see. In the first article we went over some basic questions to answer before trying to dive into the work, the planning part. Now that we will assume those questions are answered lets take a look at actually going about solving some of these problems and getting down to the tasks of doing the preparation work.
As a review lets go back to our last set of questions seen below here:
Planning, Preparation and Painting
- Has the surfaces been previously painted/coated, what condition is the paint/coating in?
- What condition is the substrate in?
- Is the substrate or paint film faded, rotten, moving, peeling, cracking or flaking?
- Do I need to use a power washer?
- How has it held up for you?
- What colors or paint might be a better choice? What color change will be if any?
- What repairs, if any, might I do to alleviate the situations?
- What type of paint exists on the surface now, oil or water based?
- How much prep work do I need vs. want? Fix what’s broken, or go further
- Is lead present in any of the paint layers?
When looking over some of these questions about the surface conditions in your space you may find that there are a host of all sorts of problems, some of them you are not even sure of. If you find this is the case then its time to read the Paint Can! Yes the Paint Can! Funny as it sounds, much good advice, even great advice can be gleaned off of most brands of paint. In fact, I have found that many problems with painting projects that have failed can be traced back to these simple steps being ignored or done poorly. So pay attention! Here is a picture below…

As you can see the information on the back of the paint can will tell you what the features, recommendations, general descriptions and limitations are for the particular product you want to use. But even basic directions are sometimes not followed… Interior, exterior, (yes I have seen my share of interior paints used outside). As well, if you have any concerns about the surface and what’s needed to make it look good or just make the paint stick to the surface then look at this…
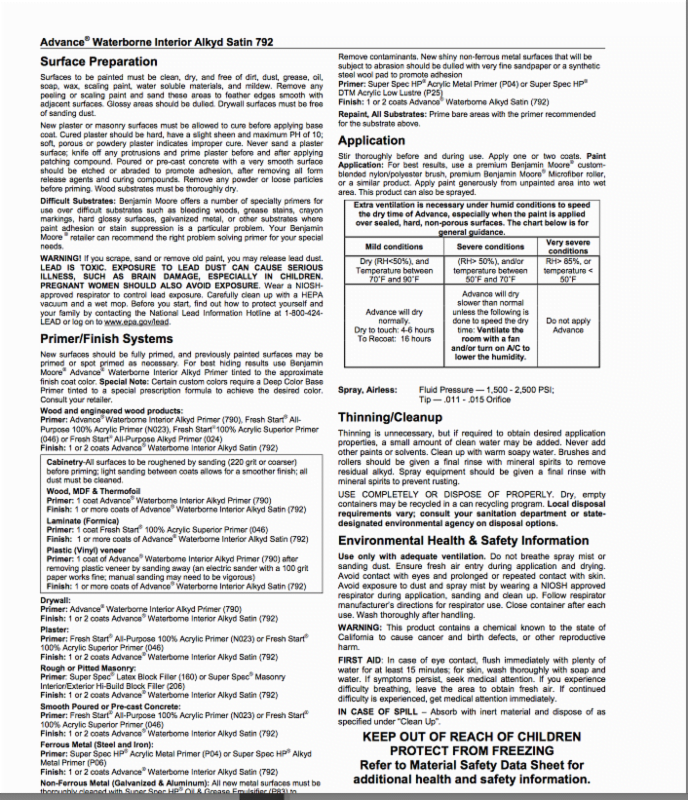
This will tell you about compatibility with surfaces to be painted, which primers to use and of course the general golden rule.
“Surfaces to be painted must be clean, dry, and free of dirt, dust, grease, oil, soap, wax, scaling paint, water soluble materials, and mildew. Remove any peeling or scaling paint and sand these areas to feather edges smooth with adjacent surfaces. Glossy areas should be dulled. Drywall surfaces must be free of sanding dust.”
Benjamin Moore Paint Co.
Of course we’ve all heard the famous quote from Thomas Edison; Genius is one percent inspiration, ninety-nine percent perspiration. Well, painting works much the same way unfortunately. Most times the job will only look as good as the preparation, and of course the actual painting application itself counts as much in its own right. Sloppy paint work over a well executed prep job doesn’t count for much.
The next question you may want to answer is; “Do I fix only what’s “broken” or do I make everything look as good as possible?” Whats the difference you ask? The difference is in the details. As an example we are asked many times if an interior wall or ceiling “needs” skim coating, or is it ok as is. If you want the surface to look as good as possible with no faults then you go ahead and try to get your surface “back to new” if that is your goal. Lighting will influence this as well. If you only want to maintain the surface and don’t mind a few imperfections, then sure you can go ahead and only fix the cracks and sand off any loose paint. As long as you meet the requirements set forth above on the directions for surface preparations then you are free do do as you wish when the time comes to apply your top coats. There are many types of budgets, reasons, and levels of work that people want out of a paint job, but no paint job should be done so poorly as to fail prematurely or just be done plain incorrectly. Always follow good basic rules before applying a coating. Once done it’s really hard to undo!
When faced with an older type of structure whether interior or exterior there are often layers upon layers of paint coatings, some going back two centuries or more in some parts of the U.S. This can present many problems for which there are many solutions.
There are what can be categorized as both “Additive” painting preparations and “Subtractive” preparations. Whether done completely or partially, additive ones generally “add” to the surface, while subtractive ones take layers of previous coating off by starting fresh or fresher. Additive ones are ones that fill into, cover over, or blend in with the existing levels or grade of dry paint films. Subtractive types use any number of stripping, sanding, grinding, steaming, or blasting methods to get back down to the actual or closer to the existing substrate whether wood, metal or stone. Additive ones are the most economical, practical and widely used. Subtractive ones are the most comprehensive, time consuming but also solve the most problems by pushing the re-start button as it were for the coating cycle of your surface. Knowing when, and why to use one, versus the other will depend largely on your expectations, general approach, site conditions and budget. This can be a hard to determine for the typical layperson, so you may want to consult with an expert or do additional research.
Directions on the back of paint cans and making it look good are of course two entirely different things all together. However, sometimes they might be one and the same and other situations will say that they are not the same. Detailed and picky as it is, is why there are so many different interpretations of what constitutes a good paint job.
Here are some general tips that we follow and that I think will help you in taking an overview next time you are evaluating a painting bid or doing the work yourself.
- Always maintain the lowest dust environment as possible.
- Be patient, good results take time.
- Be aware of both additive and subtractive preparation procedures. Both have pros and cons.
- Always use the very best tools even down to the best sand paper. Yes, they make really expensive sandpaper and it works!
- Always follow the basic directions of painting on a sound surface. If in doubt consult an expert. Then the rest is gravy, do as much prep work as you have time or money to spend on.
- Always use the best primer and the most appropriate primer for your specific task, this is no time to get cheap. Primer is not primer.
- Always use the best paint you can for your budget. Generally speaking more costly paint will perform better, last longer and look better.
- Do your research on all products and what’s available. Yes, there are far too many gimmicks out there but there are also many things that truly work well.
- Maintain a clean, safe and organized work space. Be alert as to your impact on your surroundings as well as inside your work space. And conversely to the impact of your surroundings on the Work! Humidity,
- Wind, Temperature, Dust, Pollen will impact how your project turns out.
- Protect yourself and others by wearing the appropriate clothing, masks, gloves. Use the most advanced and practical ways of isolating your work space to minimize the impact you will have to the rest of the house or your neighbors. Follow the EPA’s RRP rule.
- If you are not sure test colors, products and techniques yourself before using them on a bigger scale.
- Take the time to remove and or protect everything around your project from damage or paint splatter.
- Label, inventory items so putting them back later is easier. Use plenty of coverings over furniture or plantings as needed.
- Be confident in your color choice, don’t wing it only to find out later you could have done better. Test out your colors and keep an open mind, take your time in deciding.

I hope this article has been helpful in getting your painting project ideas flowing? Let me know at my email address, jp@jpinteriors.com and look out for my next article on choosing different primers, paints, colors and decorating ideas for achieving flawless results! Now that you have a plan… give us a call for any advice, or to schedule an estimate should you feel that you would like some help with it. 718-227-1200.